How to Docker Compose a developer environment: an open source example
An efficient team needs to have an easy way of setting up a development environment. This is a detailed example of how to do it.

As we mentioned in a previous blog post, you should strive to have a simple and repeatable way of setting up a dev environment for your project.
In this blog post we are going to go into details of an example from one of the open source projects at Akvo.
IMHO, having a painless way of setting up a dev environment is one of the key aspects to remove some of the friction for contributors to open source projects.
Akvo Lumen Architecture
The project that we are going to look at is called Akvo Lumen, which is an “easy to use data mashup, analysis and publishing platform”.
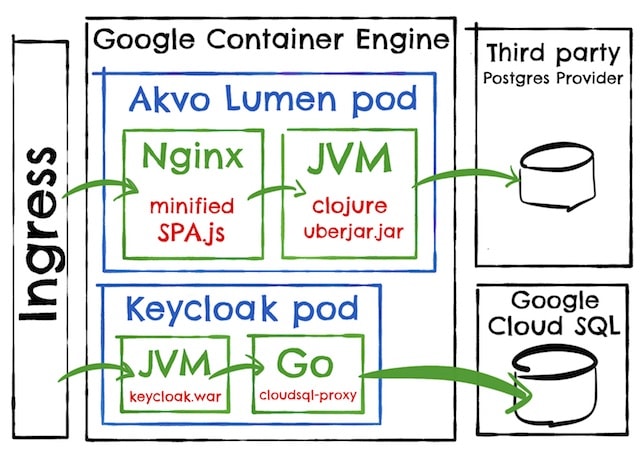
Akvo Lumen is a Javascript single page application (SPA) with a Clojure backend, as follows:

- Keycloak is an open source single sign on application. It is shared with other Akvo products.
- Nginx serves the SPA and proxies the request to the Backend.
- The Backend is the backend …
Before docker compose
The instructions to setup the dev environment were what we can call the “classic” ones: install Postgres, run this init script, download this build tool, run this command …
But in this particular case they were split into three files: keycloak, backend and SPA.
Personally, while following the instructions, I did not realized that I had to run KeyCloak locally and one of the npm dependencies would not compile in my developer box. I still do not know why. I don’t really want to know.
Of course, there is a better way.
Instructions after docker compose
The new instructions after docker compose are here, which can be summarized as:
sudo sh -c 'echo "127.0.0.1 t1.lumen.localhost t2.lumen.localhost auth.lumen.localhost" >> /etc/hosts'
docker-compose up -d && docker-compose logs -f --tail=10
The first step is required because Lumen is a multi tenant product and the tenant is based on the host.
The second step is basically the same as docker-compose up, but without docker-compose holding your console hostage.
Interestingly, note the absence of any npm install or mvn install from the instructions.
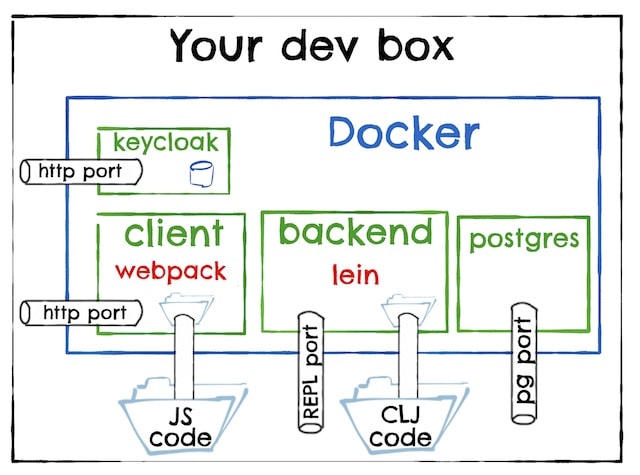
After that, we will be running:

The docker compose file
The whole docker compose file can be found at here.
Postgres and Keycloak
Let’s start by looking at the Postgres image:
postgres:
  build: postgres
  ports:
   - "5432:5432"
Strictly speaking, we do not need to expose the Postgres port, but it is useful during development to be able to inspect the DB tables with some UI tool.
The Dockerfile is extremely simple:
FROM postgres:9.5
ADD ./provision  /docker-entrypoint-initdb.d/
Following the instructions of the Postgres official image, we copy our initial setup scripts and they will be run the first time the container starts.
The scripts just creates a bunch of empty databases. It will be the Lumen Backend the one that creates the required tables and reference data as part of the DB migration logic.
The Keycloak image is very similar, but setups the initial set of users, passwords and credentials in a Keycloaky way.
Lumen Backend
The Lumen Backend is a Clojure service. Its docker compose configuration looks like:
backend:
 build:
   context: ./backend
   dockerfile: Dockerfile-dev
 volumes:
    - ./backend:/app
    - ~/.m2:/root/.m2
    - ~/.lein:/root/.lein
 links:
    - keycloak:auth.lumen.localhost
 ports:
    - "47480:47480"
The first interesting point is that it uses a different Dockerfile than the production one.
During development, we need our build tools, Lein in our case, plus we want the fast feedback cycle that a good REPL provides, while in production we just want a fast start up time.
Note that because our build tools come as part of the Docker image, everybody in the team will be running exactly the same version of Lein, on exactly the same JVM and OS. Other projects could use different Lein versions, or different tools, but containers isolate one project from the others.
We do not want to be rebuilding and restarting our Backend Docker image every time we make a change in our source files, so the first line of “volumes” (- ./backend:/app) makes the source code available to the Docker container: any change in the source files will be immediately visible inside the container.
The second volume that we mount is the local maven repository (- ~/.m2:/root/.m2). This somehow pollutes your developer box, as deleting the Docker container will not get rid of the downloaded dependencies, but in theory your local maven repository is just a cache, so you can delete it without repercussions whenever it gets too big.
If you don’t want to pollute your developer box at all, you can make use of layers and download the dependencies just when there is a change in the project file.
The last volume (- ~/.lein:/root/.lein) makes the Lein global profiles available to the container. Use with care as you want to avoid any “it works on my machine” issues.
Even if the Keycloak container is accessible by the Backend using the hostname “keycloak”, we need the link (- keycloak:auth.lumen.localhost) due to JWT validation requiring the single sign-on host to be the same one for the client (the browser) and the backend.
Last, we make the REPL port available so you can connect to it with your favourite IDE. You will need to explicitly configure the lein :repl-options to listen to that port and to allow connections from any host
Lumen Client
The Lumen Client image is a Nginx that servers the SPA and proxies other requests to the backend.
client:
 build:
   context: ./client
   dockerfile: Dockerfile-dev
 volumes:
    - ./client:/lumen
 ports:
    - "3030:3030"
Again, for development we prioritize a fast feedback cycle, so the Docker images between production and development are different.
In this case, we have replaced Nginx with a webpack Dev Server which will recompile the SPA and do a hot code reload on your browser whenever we make a change on our source code. The mounted volume is to make the source code accessible inside the container.
The exposed port is just the main application entrypoint.
Running tests and other build tasks
As you don’t need to install any npm, lein or maven in your local box, to run any tasks provided by those tools, you just need to run them from within the Docker container.
For example, to run the Backend tests:
docker-compose exec backend lein test
Or if you are going to run several commands, you can always start a bash shell:
docker-compose exec backend bash
Tip: if you want to preserve the bash history, just add another volume to the Docker Compose file that mounts the home directory.
A note on startup dependencies
Docker Compose provides very little help to ensure the startup order of the containers.
It is up to you to make sure that the dependant container waits long enough for the dependency to be ready, usually by polling with some maximum time limit.
For this project, the Backend depends both on Keycloak and Postgres, but the Backend consistently takes longer than both to startup, so we are ignoring the issue for now.
Examples in other projects on how to deal with the startup dependency issue:
- Checking that a DB is ready by querying the last table created for some data
- Checking that Kafka is ready by listing the topics and finding the last created one
An environment upgrade
It happens that one of the new features in Akvo Lumen is to provide some interactive maps.
This means that the project now needs:
Which now that we have Docker Compose can be done with:
--- a/postgres/Dockerfile
+++ b/postgres/Dockerfile
-FROM postgres:9.5
+FROM mdillon/postgis:9.6

--- a/postgres/provision/helpers/create-extensions.sql
+++ b/postgres/provision/helpers/create-extensions.sql
+CREATE EXTENSION IF NOT EXISTS postgis WITH SCHEMA public;

--- a/docker-compose.yml
+++ b/docker-compose.yml
+ redis:
+   image: redis:3.2.9
+ windshaft:
+   image: akvo/akvo-maps:2469ae0cb95ba090412f042fdfa8c7038273fe0e
+   environment:
+     - NODE_ENV=development
+   volumes:
+      - ./windshaft/config/dev:/config
And one docker-compose down; docker-compose up –build later, the whole team is enjoying the new setup.
Isn’t that beautiful?